Since its invention and market introduction in 1973, the magnetic drill has seen many developments. There are various types of magnetic drills depending on their intended use. Below is brief information about the types of magnetic drills.
This is a complete step-by-step guide on the use of plate beveling machines. In short, this article covers the following aspects.
- SKF 25 beveling machine components
- Safety precautions before installing the plate beveling machine
- Checking the workpiece
- Milling head adjustment for the groove opening machine
- Adjusting the width setting of the source mouth opening machine
- Adjusting the angle
- Team change
- Routine machine maintenance
SKF 25 plate beveling machine components
Safety precautions before installing a plate straightening machine
The washing machine can only be operated in a horizontal position.
Secure the workpiece.
The workpiece surface must meet the following requirements.
The surface must be smooth and free of any burning points, slag, weld seams, or the like.
Remove surface irregularities before starting the milling process.
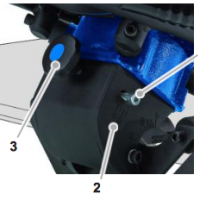
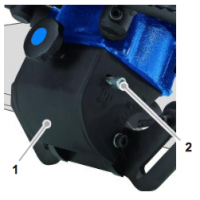
Adjusting the milling head
Place the machine on the top side (power connection cable).
Release the locking mechanism (2) on both sides of the machine.
Set the milling angle you want.
The milling angle can be seen on the scale (1).
Tighten the locking mechanism (2) on both sides of the machine.

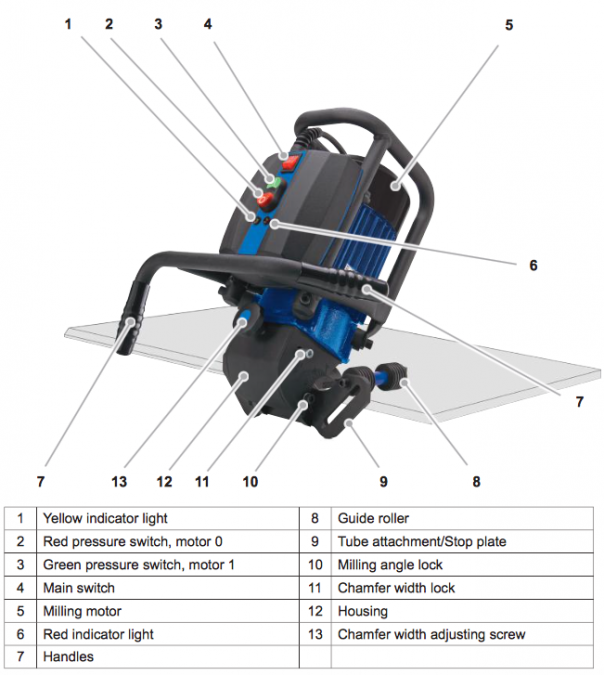
Page width adjustment
Place the machine on the top side (power connection cable).
Release the locking mechanism (1).
Adjust the desired cutting angle by rotating the spindle (3).
The pah width can be seen from the scale (2).
Tighten the locking mechanism (1).
Mounting the guide cylinder for fretting plates
Mount the plate as shown in the figure.
Fix the guide rollers (2) to the bore (1) with a washer and a nut.
Apply the following for milling:
Align and secure the workpiece horizontally.
Mount the guide pulley according to the desired application.
Adjust the milling angle and chamfer width.
Plug the plug into the electrical socket.
Position the machine over the workpiece so that the milling cutter does not enter the workpiece.
Start the machine,
Slowly slide the license plate holder left and right in the direction of the arrow. The tool operates against the direction of movement.
Turn off the plate compactor
Unplug the plug from the electrical outlet.
How to use the plate compactor
The following procedure demonstrates how to operate the plate-rolling machine:
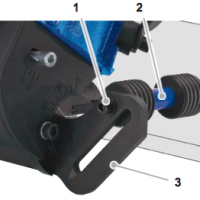
Turn on the machine.;
Turn the main switch (1) to the “1” position.
Press the green pressure switch (2) to start the freezer motor. The yellow indicator light (4) will illuminate.
Don't turn off the machine.;
Press the red pressure switch (3) to turn off the freezer motor.
Turn the main switch (1) to the “0” position.
Restart after overload.;
To restart the machine after an overload, first press the red pressure switch (3) and then the green pressure switch (2).
The red indicator light (5) flashes temporarily in case of overload.
In case of continuous overload, the red indicator light (5) lights up and the milling motor is switched off.
Replace the cutting tools (inserts) only when the machine is switched off and stopped. Unplug the power cord.
Only use tools, adapters, and accessories that match the machine.
Rotating the cutting edge side;
Place the machine on the top (power connection cable)
Unscrew the screw (2).
Remove the housing (1).
Unscrew the retaining screw (3), turn the reverse plate, and retighten the retaining screw.
Repeat the procedure for all reverse plates of the milling machine.
Reinstall the cover and tighten screw (2).
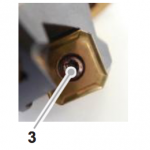
Replacing the tips;
When the brake pad is completely worn, it should be replaced with a new one.
Unscrew the torque screw and remove the tip.
Insert the tube and retighten the fixing screws.
